Monday, November 11, 2024
How to build a functional 10x12 garden shed from scratch

Alright, you've finally decided to take the plunge. You're going to build your own garden shed! I'm with you - a well-built shed can be a lifesaver, a sanctuary, and an amazing addition to your backyard. But let's be honest, it can also seem pretty daunting. Don't worry, I'm here to help.
This guide will walk you through building a functional 10x12 shed from scratch. We'll cover everything from planning and materials to the final touches. So grab a cup of coffee, put on your favorite construction playlist, and let's get building!
Step 1: The Blueprint - Planning Your Paradise
First things first, let's get that blueprint in order. You want to make sure your shed is the perfect size and shape for your needs. Here's what to consider:
Location, location, location! Choose a level spot with good drainage. Make sure it's accessible and away from any power lines or trees.
Size matters. A 10x12 shed is a great size for most purposes. But consider what you'll be storing. Do you need extra space for a workbench, lawnmower, or even a small refrigerator?
Style and design. Do you want a traditional shed, a modern one, or something with a unique style? Check out some online resources for inspiration!
Building codes. Before you start, double-check local building codes. They can vary from place to place, so it's always best to be safe.
Step 2: The Foundation - A Strong Base for Your Shed
Now that you've got your blueprint, it's time to think about the foundation. There are a few different options, so choose the one that best suits your needs:
Concrete slab: The most durable and long-lasting option. You'll need to pour a concrete slab that's at least 4 inches thick and reinforced with rebar.
Pressure-treated wood piers: A good alternative to concrete. Set the piers on a bed of gravel, ensuring they are level and plumb.
Concrete blocks: Easy to lay and relatively inexpensive. Make sure to use blocks that are specifically designed for building foundations.
Step 3: Framing - The Backbone of Your Shed
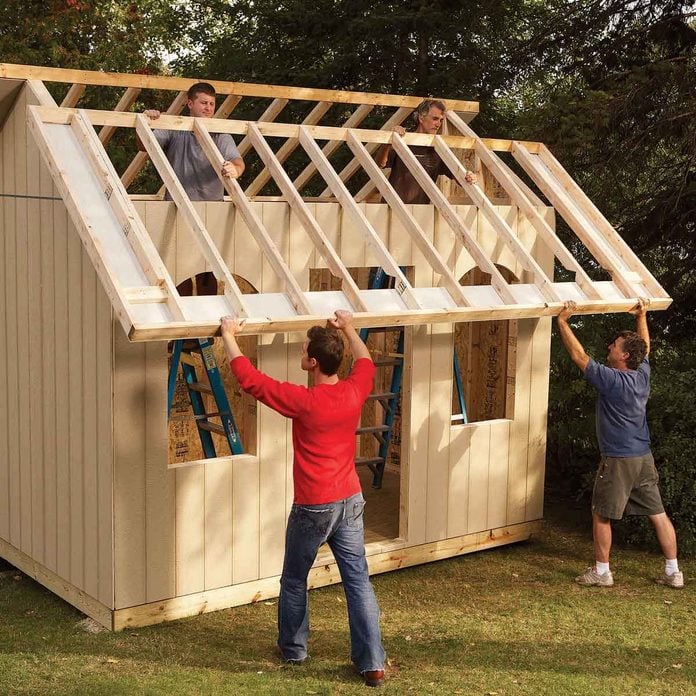
With the foundation in place, you can start framing the walls and roof. Here's the breakdown:
Floor joists: Use pressure-treated lumber for your floor joists. They need to be spaced 16 inches apart and securely fastened to the foundation.
Wall studs: These are the vertical supports for your walls. They should be 2x4s spaced 16 inches apart.
Roof rafters: The rafters form the triangular shape of your roof. You'll need to determine the roof pitch and spacing for the rafters, which is often determined by local building codes.
Sheathing: This is the material that covers the framing and provides support for the roofing and siding. You can use plywood, OSB, or even composite sheathing.
Step 4: Roofing - A Safe and Secure Cover
Time to give your shed a roof! Here are the main steps:
Underlayment: This is a waterproof layer that goes under the shingles. It protects the sheathing from moisture and adds extra protection.
Shingles: Choose the type of shingles that best suits your needs and budget. Asphalt shingles are the most common and affordable.
Flashing: This is metal or plastic material that helps direct water away from the edges of the roof. You'll need flashing around chimneys, vents, and other roof penetrations.
Step 5: Siding - Adding Style and Protection
The siding not only looks good, it protects your shed from the elements. Here are some popular choices:
Vinyl siding: Durable, low-maintenance, and comes in a wide variety of colors.
Wood siding: A classic look that can be painted or stained.
Fiber cement siding: Resistant to moisture, insects, and fire.
Step 6: Doors and Windows - Entrance and Airflow
Now for the finishing touches:
Doors: Choose a durable door that fits your shed's size and style. You can opt for single or double doors, depending on your needs.
Windows: Adding windows allows natural light into the shed and improves ventilation. Choose the size and number of windows based on your preferences.
Step 7: Interior - Make it Your Own
Now it's time to make your shed a personal space!
Flooring: You can choose from a variety of flooring options, such as wood, tile, or concrete.
Shelving and storage: This is the fun part! Add shelving, hooks, and other storage solutions to organize your belongings.
Electricity: If you want to add electricity to your shed, you'll need to consult with an electrician.
Step 8: Finishing Touches - The Cherry on Top
You're almost there! Here are some final touches to complete your masterpiece:
Painting or staining: Give your shed a fresh coat of paint or stain to protect the wood and add some personality.
Landscaping: Add some landscaping around your shed to enhance its appearance and create a welcoming space.
Building Your Dream Shed: A Real-Life Experience
Building a shed from scratch is a rewarding experience. You'll learn a lot about construction, and the end result will be a space you can truly call your own.
Remember to take your time, be patient, and don't be afraid to ask for help if you need it. And most importantly, have fun!
Bonus Tips:
Safety first: Wear safety glasses, gloves, and sturdy shoes while working.
Use quality materials: Investing in good quality lumber and other materials will ensure your shed lasts for years to come.
Don't rush: Building a shed takes time, so don't rush the process.
Document everything: Take photos and notes along the way so you can refer to them if needed.
Now get out there and start building your dream shed!
No comments:
Post a Comment